72 Olds 442 clone (with Gen III swap)
 August 29th, 2013, 11:47 AM
#321

Gary,
Here is another stupid question: I didn't notice an ignition box of any kind(MSD or similar), is it just not needed with an LS due to COP? Is it just power to the ECM from the fuse box?
Thanks
Here is another stupid question: I didn't notice an ignition box of any kind(MSD or similar), is it just not needed with an LS due to COP? Is it just power to the ECM from the fuse box?
Thanks
 August 29th, 2013, 12:15 PM
#322
Registered User
Thread Starter

Join Date: Nov 2010
Location: St Louis, MO
Posts: 904
No separate box needed. The ecu is programmed to control injectors and ignition. As a matter of fact the ecu controls fuel pump, cruise control, fans, AC, alternator, power steering (variable assist) even gauges if you kept the originals....pretty much everything except the horn.
August 29th, 2013, 12:23 PM
#323
No separate box needed. The ecu is programmed to control injectors and ignition. As a matter of fact the ecu controls fuel pump, cruise control, fans, AC, alternator, power steering (variable assist) even gauges if you kept the originals....pretty much everything except the horn.
August 29th, 2013, 07:56 PM
#324
Registered User
Thread Starter
Join Date: Nov 2010
Location: St Louis, MO
Posts: 904
The stock spark control integrates all the input sensors as well as knock sensors and does a pretty good job. I doubt on anything remotely stock would do as well.
The spark tables are programmable and pretty common to upgrade even with a mail order "performance" tune.
The spark tables are programmable and pretty common to upgrade even with a mail order "performance" tune.
November 13th, 2013, 01:34 PM
#325
Registered User

Join Date: Nov 2007
Location: Houston Tx
Posts: 96
I'm working on a 72 Cutlass with a LQ4 6.0 swap with LS3 heads/intake and 4L60 trans...... The motor is in the car, wire harness has been modified to 4 wire setup that's hard wired to Power, Ground, Fuel Pump, and Accessory and is up and running..... wondering if you have any pointers on the wiring as I've never rewired a whole car by myself..... I bought an American Auto Wire Highway 22 Fuse Panel Kit but I'm not sure were to start and what needs to be tapped into the original wiring on the car(meaning which relays etc have to stay and what can go)
November 13th, 2013, 01:55 PM
#326
Registered User
Thread Starter
Join Date: Nov 2010
Location: St Louis, MO
Posts: 904
Wow, big project for first time, but I'll try.
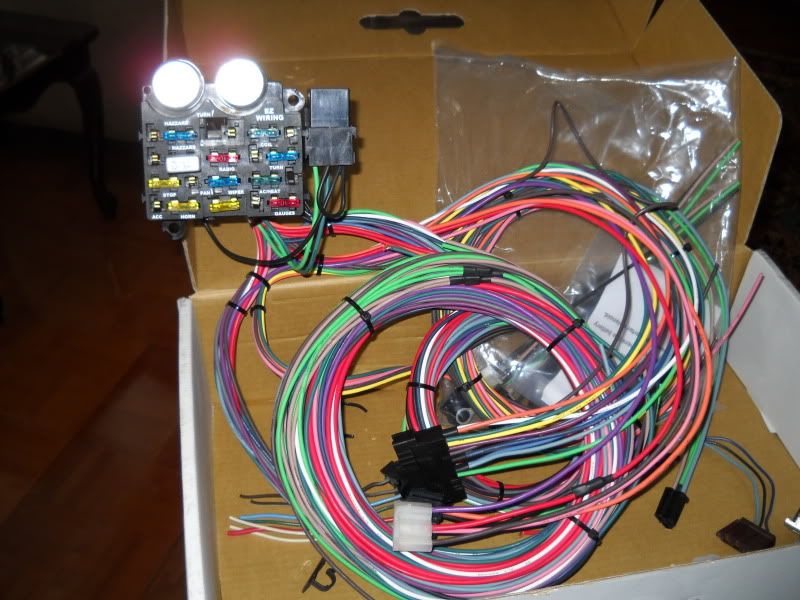
If you're using electric fans, don't wire through the fuse panel. They can pull over 50 amps, a lot for any circuit. Wire them through relays directly to the alternator (fused).
The LQ alternators can put out 200+ amps, so if there's a larger gauge wire for the feed to the panel, use it.
The aftermarket harnesses are pretty well labeled and laid out. You should be able to easily hook the hot into a fused full time source (could be dome lights). Your keyed ignition can be the old coil wire (just be sure it's hot in run and crank). You'll still need the fuel pump relay and your fuse panel probably has a circuit for that.
Honestly, a lot depends on how you want it wired. I used weatherpack connections under the hood and molex connectors inside so everything can be assembled outside the car, then plugged in.
Are you getting rid of all the cars original wiring?
I'm working on a 72 Cutlass with a LQ4 6.0 swap with LS3 heads/intake and 4L60 trans...... The motor is in the car, wire harness has been modified to 4 wire setup that's hard wired to Power, Ground, Fuel Pump, and Accessory and is up and running..... wondering if you have any pointers on the wiring as I've never rewired a whole car by myself..... I bought an American Auto Wire Highway 22 Fuse Panel Kit but I'm not sure were to start and what needs to be tapped into the original wiring on the car(meaning which relays etc have to stay and what can go)
November 13th, 2013, 02:27 PM
#327
Registered User
Join Date: Nov 2007
Location: Houston Tx
Posts: 96
yea I honestly after looking at everything I feel like this project will be too overwhelming for me, so I will probably end up getting someone who's done it before to either help or do it for me. I currently have the electric fans and fuel pump setup on 2 relay kits that are wired directly to the battery with a toggle switch to turn them on/off and the ignition switch is wired to a push button switch rather than using the keyed ignition switch on the column.....
November 16th, 2013, 10:22 AM
#328
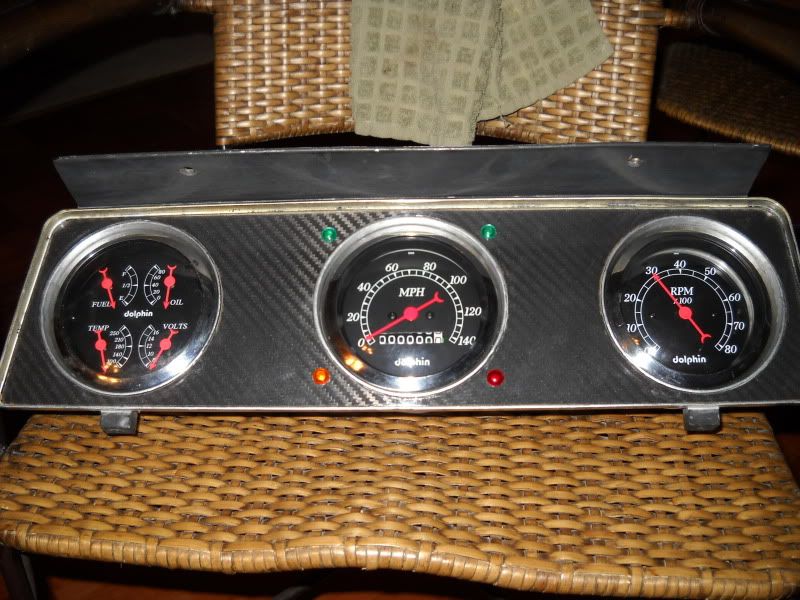
[QUOTE=garys 68;231489]OK, here's where you guys are really going to rip on me. I needed new gauges, liked the 3 gauge layout, but hated the woodgrain.
I'll be using the same overlay material on the center console and door woodgrain pieces.
DSCN0140.jpg
What's the part numbers on the gauges ? This is what I want to do with mine
Thanks
I'll be using the same overlay material on the center console and door woodgrain pieces.
DSCN0140.jpg
What's the part numbers on the gauges ? This is what I want to do with mine
Thanks
November 16th, 2013, 10:35 AM
#329
Registered User
Thread Starter
Join Date: Nov 2010
Location: St Louis, MO
Posts: 904
Here's the page, although I got a better deal through an ebay seller.
http://www.dolphingauges.com/dolphin_gauges.html
And for indicators, I used 12 V LEDs. But found these afterwards and like them much better:
http://www.snakebite.com.au/logodash...ach-p-494.html
http://www.dolphingauges.com/dolphin_gauges.html
And for indicators, I used 12 V LEDs. But found these afterwards and like them much better:
http://www.snakebite.com.au/logodash...ach-p-494.html
November 16th, 2013, 11:19 AM
#330
Here's the page, although I got a better deal through an ebay seller.
http://www.dolphingauges.com/dolphin_gauges.html
And for indicators, I used 12 V LEDs. But found these afterwards and like them much better:
http://www.snakebite.com.au/logodash...ach-p-494.html
http://www.dolphingauges.com/dolphin_gauges.html
And for indicators, I used 12 V LEDs. But found these afterwards and like them much better:
http://www.snakebite.com.au/logodash...ach-p-494.html
Thanks for the info

 January 16th, 2014, 07:40 AM
#335
Registered User
Join Date: Jul 2010
Location: Cazenovia, NY
Posts: 206
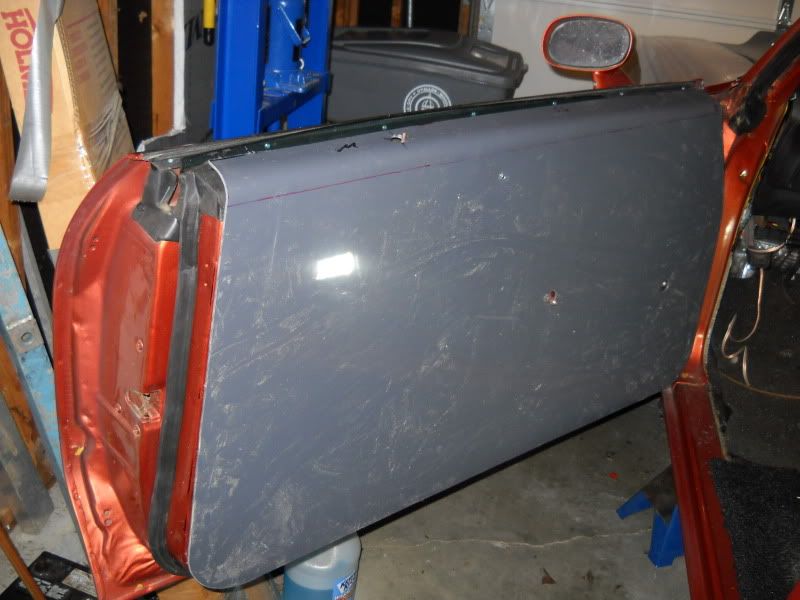
The old door panels were in pretty poor condition. And I really didn't want to spend money on new panels that I would probablt end up modifying. So I picked up a $50 4 x 8 sheet of pvc and started making my own this afternoon.
The plan is to reuse the armrest, hardware, and badges but update and simplify the looks.
I'll rivet/glue on a metal lip and the felts tomorrow, and add the chrismas tree fasteners..
The plan is to reuse the armrest, hardware, and badges but update and simplify the looks.
I'll rivet/glue on a metal lip and the felts tomorrow, and add the chrismas tree fasteners..
 January 16th, 2014, 07:45 AM
#337
Registered User
Join Date: Jul 2010
Location: Cazenovia, NY
Posts: 206
January 17th, 2014, 01:14 AM
#338
Registered User

Join Date: Jan 2014
Location: Camdenton, MO
Posts: 342
Just look up plastics in the yellow pages. I've used Regal Plastics here in St Louis for Plexiglass, Lexan, PVC, adhesives, etc.
It's just 1/8" PVC.
Lots more details here:
http://www.pro-touring.com/threads/7...l-build-thread
It's just 1/8" PVC.
Lots more details here:
http://www.pro-touring.com/threads/7...l-build-thread
May 23rd, 2014, 04:28 AM
#339
Registered User
Join Date: Jan 2014
Location: Camdenton, MO
Posts: 342
Cars came out after long winter sleep. Running great but one thing bothered me from when I re-did the rear brakes a couple years ago. First was the drums didn't match. Then the cheap Chinese shoes I put on were all the same size (no short vs long). Anyway, I was at the parts store and looked at another pair of shoes, yep...one long one short per side, so bought them. Looking at the brake drums I discovered the drivers side dragged a bit through about half the revolution. So Rock Auto came through with a new pair of drums.
Old mismatched drums. Oh yeah, note the drum on the left I tried hammering, heat, etc....wouldn't come off. Took the air hammer around the face, had it off in 5 min.:

New shoes, long and short:

New drums:

And assembled. Kinda nice having important parts like brakes put together correctly.
assembled_zps1e548102.jpg
Last edited by garys 68&72; May 24th, 2014 at 01:09 PM.
June 3rd, 2014, 08:14 AM
#340
Registered User
Join Date: Jan 2014
Location: Camdenton, MO
Posts: 342
Weird week. Over the weekend I was dropping off someone at the airport while driving the Olds. Security outside pulls me over as I'm leaving. I'm having visions of them tearing apart my car searching for a bomb or drugs, etc. The guy just said he wanted to check out my car.
Then on the way into work yesterday some guy pulls up next to me on the highway asking how much for my car. I wasn't really interested in that discussion at 70mph in rush hour, but he offers $10k.
I guess the "atomic orange" paint attracts attention.
Then on the way into work yesterday some guy pulls up next to me on the highway asking how much for my car. I wasn't really interested in that discussion at 70mph in rush hour, but he offers $10k.
I guess the "atomic orange" paint attracts attention.
 June 7th, 2014, 02:16 PM
#343
Registered User
Join Date: Jan 2014
Location: Camdenton, MO
Posts: 342
So after doing the rear drums I rotated the tires. That resulted in slight vibration at about 80mph and a front end wobble when braking at about 5mph. Guessed bent rim. Didn't feel it on the rear but was more obvious when on the front.
So craigslist found me a pair of 72 Olds wheels with the bolt on centers for $20.
Biggest problem was finding the 05 sunburst orange paint. Ended up ordering off ebay at $29 for a rattle can.
Wheel as I got it:

And after priming and putting a few coats of paint:

So craigslist found me a pair of 72 Olds wheels with the bolt on centers for $20.
Biggest problem was finding the 05 sunburst orange paint. Ended up ordering off ebay at $29 for a rattle can.
Wheel as I got it:

And after priming and putting a few coats of paint:
 June 9th, 2014, 02:34 PM
#345
Registered User
Join Date: Jan 2014
Location: Camdenton, MO
Posts: 342
Damn, all those little things I let go initially are coming back to bite me. I think I replaced EVERYTHING in the dash except the headlight switch and wiper switch. Well the rheostat dimmer for the dash gauges is getting flaky. So after $12 at Oreileys, I got a new switch. Now I just got to try to get my feeble mind to remember how the plug goes on, where the pull release button is oriented....Then see if my chubby fingers can reach up in there.
June 9th, 2014, 09:28 PM
#346
OK, here's where you guys are really going to rip on me. I needed new gauges, liked the 3 gauge layout, but hated the woodgrain.
I'll be using the same overlay material on the center console and door woodgrain pieces.
The vortec motors come with 140 amp up to 250 amp alternators. So an upgraded new wire harness is next to go in.
I'll be using the same overlay material on the center console and door woodgrain pieces.
The vortec motors come with 140 amp up to 250 amp alternators. So an upgraded new wire harness is next to go in.
Just tonight had to cut out the batt tray looks like it leaded acid for a while with the PO not taking care of it. Now need some metal, the tray, and the bracket & hardware under it. But still enjoy it just need more hours in the day.
June 10th, 2014, 01:16 AM
#347
Registered User
Join Date: Jan 2014
Location: Camdenton, MO
Posts: 342
An Olds purist said to me that no one would believe that's real carbon fiber. My response, no one ever believed the original was real wood.
That's funny I'm using the same thing in my 72 Cutlass also a clone. Hated the contact shelve paper wood grain from way before 72. But I didn't say anything yet. I have it but it's a ways down the road on mine. I am however going with the 455 & the OSI hood. Waiting on my motor (family)can hear my elderly mother now " let your brother play" Well I did he knows what's he's doing just has a had time getting off the bar stool sometimes. Nice build will follow along. Soon as I figure out how to post pics from my phone would be happy to share.
Just tonight had to cut out the batt tray looks like it leaded acid for a while with the PO not taking care of it. Now need some metal, the tray, and the bracket & hardware under it. But still enjoy it just need more hours in the day.
Just tonight had to cut out the batt tray looks like it leaded acid for a while with the PO not taking care of it. Now need some metal, the tray, and the bracket & hardware under it. But still enjoy it just need more hours in the day.
June 10th, 2014, 04:09 AM
#348
major noob
Join Date: Sep 2013
Location: claremont, nc
Posts: 1,926
Gonna say I admire your work I wish the omega had custom in dash gauges available but I guess I can build a similar instrument cluster back cut holes and install them but id love to know how to wire it up 
June 10th, 2014, 12:40 PM
#349
Registered User
Join Date: Jan 2014
Location: Camdenton, MO
Posts: 342
Headlamp switch replaced. No too difficult to get my hands in there. But the first switch I got at the auto parts store would not engage the push in shaft of the switch.....defective. Back to the store to get a replacement. Note, always check parts before you stand on your head to install it.
Wow, never knew my dash lights were this bright...lol. Guessing the headlight switch was never right.
Wow, never knew my dash lights were this bright...lol. Guessing the headlight switch was never right.
Last edited by garys 68&72; June 10th, 2014 at 04:44 PM.
July 8th, 2014, 01:01 PM
#350
Registered User
Join Date: Jan 2014
Location: Camdenton, MO
Posts: 342
OK, live and learn......I noticed the clutch letout point was getting really close to the floor, the reverse gear grinding. Only 10K miles on the clutch, thinking a linkage adjustment issue. Jack up the front of the car, reach in to push the parking brake....then I see it. The cheap floormat had delaminated and was wadding up behind the clutch pedal. Straiten it out, problem solved.
Lesson, check the REALLY simple stuff first. at least I didn't tear the entire linkage apart before I noticed.
Lesson, check the REALLY simple stuff first. at least I didn't tear the entire linkage apart before I noticed.
April 17th, 2015, 10:54 AM
#351

Steering Column
Gary, were did you get the cruise control for your column? does it screw into the location of the stock turn lever? This build has given me the push I needed to do this swap on my 71 convertible. I will be referencing this build a lot in the future.
 April 17th, 2015, 11:53 AM
#352
Registered User
Join Date: Jan 2014
Location: Camdenton, MO
Posts: 342
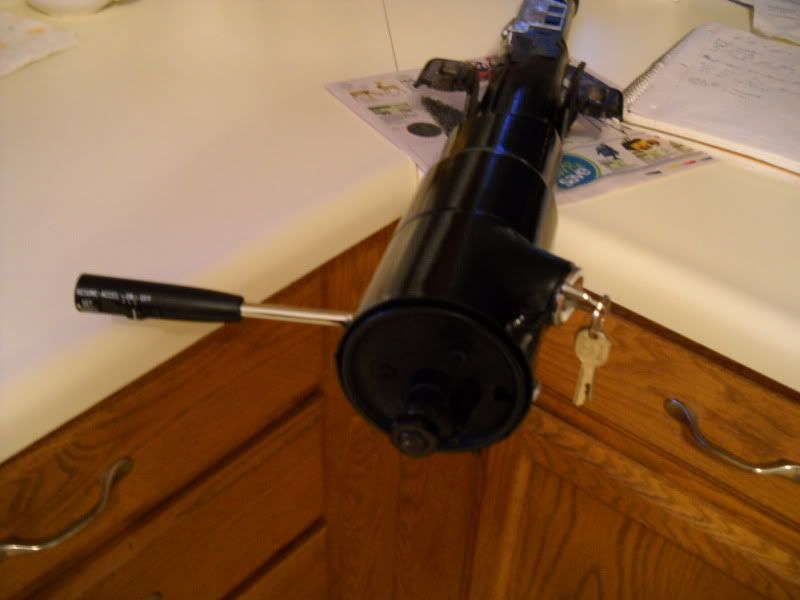
I bought the lever from Dakota Digital. It does mount with a single screw in the stock location.
It is a ford design however. That means all the but the main on/off controls are NC instead of NO. Some people have wired them with relays in order to get all controls to work. However, I noticed that one of the functions (resume?) goes closed with power from the end push button "set". So I just wired that to the cruise control.
Only the on/of and "set" work, but that's about all I typically use anyway.
There's a thread over at LS1tech about OEM GM cruise control stalks that will be a direct fit, but think it was from an 80s van that was only available through salvage yards.
BTW Dakota Digital does make a square dash mounted unit in either the Ford NC or GM NO design.
Last edited by garys 68&72; April 17th, 2015 at 11:57 AM.
February 1st, 2016, 06:29 AM
#353
Registered User
Join Date: Jan 2014
Location: Camdenton, MO
Posts: 342
Just a little update. I've been running the 2.73 rear with the 3.42 1st gear T10, which is a good combo. But I use the car about 90% highway driving. So I've been looking for some 2.56 gears to replace the 2.73. The 10% drop in rpm probably wont translate into more than 1mpg increase, but the rpm will result in a little quieter, comfortable drive. Besides, I was running out of projects on the car.
So I picked up a used running 69 chevelle 10 bolt rear with 2.56 gears in it already. It's a direct swap for the 72 10 bolt I'm running now and only cost me $50. I decided to go through it anyway, all new bearings and seals. It's the first rear I've set up, so I figured I would take my time in setup. And I can just swap it on the car over a weekend.
Rear end came apart pretty easy and looked relatively good. Oh, and no making fun of my axle dolly.
DSCN0902_zpshnlkfjxj.jpg
The carrier and gears looked pretty good, but getting off the side bearing was a pain. It took me an hour to figure out tearing off the cage/needle bearings, then cutting part way through the race with a cutoff wheel would allow me to use a bearing separator and 2 jaw puller to get it off easily. I got the 2nf bearing off in about 10 min.
DSCN0903_zpsv5oflao6.jpg
Last edited by garys 68&72; February 1st, 2016 at 06:37 AM.
February 1st, 2016, 11:56 AM
#355
Registered User
Join Date: Jan 2014
Location: Camdenton, MO
Posts: 342
70 mph was about 2400. Should be under 2200 with the new gears.
The 5/6 speed was an option, but a T56 or TKO would require tunnel cutting. And the Richmond 6 speed is no longer available. An F bodyT5 would fit, but they tend to be old and worn out.
With the 2.56 rear, I can use my current 3.42 1st T10 (although I would like a 904 iron case). A Noug Nash/Richmnond 5 speed (3.28 1st, 1:1 5th) would be nice, will fit and can occasionally be found cheap.

Thread
Thread Starter
Forum
Replies
Last Post
Aceshigh
Non-Olds Engines
157
May 30th, 2017 06:39 AM
404namenotfound
Transmission
6
March 23rd, 2014 08:53 PM
sykosoft
Electrical
3
February 1st, 2012 07:22 PM


